
Tauri
构建
首先自行安装好cargo
1 | npm create tauri-app@latest |
然后根据提示选择项目名称、前端语言、包管理器、前端框架等,不知道怎么选的话可以按照以下方式选择:

然后进入到刚创建的目录(目录下有package.json)中,然后执行下面三行命令:
1 | cd tauri-app |
执行完最后一行命令后,会开始Downloading xx crates, remaining bytes: xxx MB,会开始下载一些依赖项,时间比较长,等着就行了。执行完之后文件夹非常大,六七个G差不多,不用管,一般rust的包都很大,但是生成的exe都很小。开发完成之后直接一个cargo clean就都清理完了
运行方式
主程序
Tauri的运行是从rust的main.rs开始执行的,如果完成了上面的所有操作,建好了一个tauri的程序,那么找到main.rs:(caj2pdf是我的程序名)
1 | // Prevents additional console window on Windows in release, DO NOT REMOVE!! |
// Prevents additional console window on Windows in release, DO NOT REMOVE!!:这是一个注释,说明了下面的#![cfg_attr...]指令的作用。这个指令用于在发布版本的Windows应用程序中防止额外的控制台窗口出现。在调试模式下,这个指令不会生效,所以应用程序会显示控制台窗口。#![cfg_attr(not(debug_assertions), windows_subsystem = "windows")]:这是一个编译器指令,它告诉Rust编译器在非调试模式下(即发布模式),使用Windows子系统来运行应用程序。windows_subsystem = "windows"表示应用程序将以GUI应用程序的形式运行,而不是控制台应用程序的形式。fn main() { ... }:这是Rust程序的入口点。main函数是每个Rust程序必须包含的,程序从这里开始执行。caj2pdf_lib::run():这是main函数中的实际代码,它调用了caj2pdf_lib模块中的run函数。这意味着你的Tauri应用程序的逻辑将从这个run函数开始执行。
当你运行一个Tauri应用程序时,Rust首先会从
main.rs中的main函数开始执行,然后这个函数会去调用caj2pdf_lib模块中的run函数来继续执行应用程序的具体逻辑。build.rs文件通常用于构建脚本,在编译期间执行一些构建时任务,而lib.rs是库项目的主要文件,但在这个Tauri应用程序的上下文中,main.rs是程序运行的起点。
至于Tauri的前端index.html和main.js等,是通过tauri.conf.json文件中的配置来指定的。
1 | { |
可以看到有这样一个键:
1 | "build": { |
这个就是前端的文件夹位置,这个文件夹里有index.html文件,程序运行时可以检索到src下面的index.html。
这个前端的文件貌似只能叫index.html,尝试改成其他的html名字后发现程序找不到页面,就暂时用index.jtml吧。
然后这个tauri.conf.json里面还有一些其他的配置,应该比较好懂,改图标改初始窗口大小等等。
Tauri 基础
通信
Frontend向Rust通信
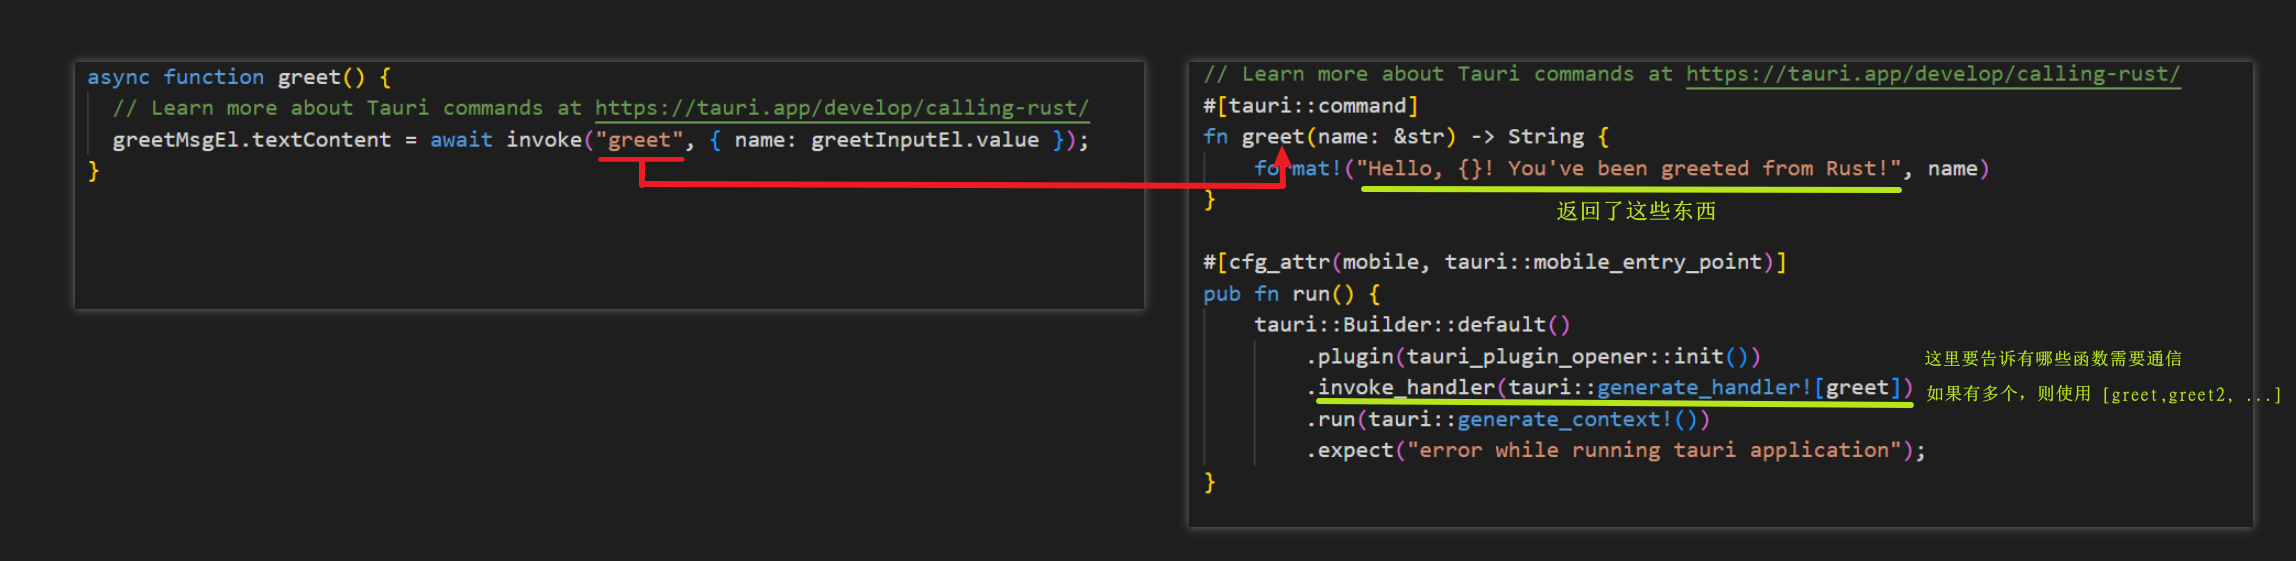
在创建项目之后的demo中,有一个greet()的方法:
1 | const { invoke } = window.__TAURI__.core; |
首先就是要引入invoke,const { invoke } = window.__TAURI__.core;
这个程序不难看出,就是获取输入框内的文字,然后点击按钮,让rust返回一句话,再显示在前端上。
现在单来看这个greet()函数:
Tauri和Electron的不同就是少了一个preload.js,感觉方便一些
在单独的模块中调用命令
现在,我们要把greet这个函数放到其他的rs模块中,首先创建一个command.rs

将greet函数剪切到command.js中,给这个函数添加pub

在lib.rs中引用,添加mod commands;
在lib.rs中的invoke,修改函数
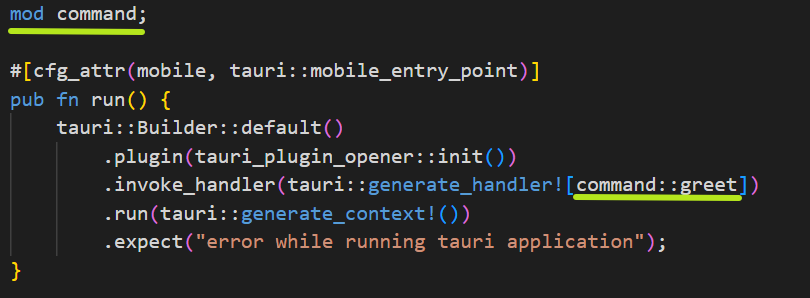
程序仍然能正常运行

Android
使用npm run tauri android dev可以进行安卓的开发
但是我没有开发过安卓,也没有什么开发安卓的应用,如果你也是,那么第一次可能会报错如下:
1 | PS> npm run tauri android dev |
问题出在没有设置ANDROID_HOME环境变量,Tauri无法找到Android的SDK
因为我之前安装过 Android Studio,所以用这个来配置,没安装过的可以安装一下